Sunday, August 30, 2015

Building a Profile Photo upload with Angular, Node/Express, Cloudinary, and Async.js

Recently I have been spending a lot of time exploring the awesome things about Node.js. The community and user contributions have been tremendous, so tremendous that I rarely find myself having trouble solving a particular problem (there is an existing NPM module out there for everything it seems). However, when approached with writing a user profile/photo upload, there was a lot of different options to weigh. Should I provide the user with some ability to crop the image like many sites do these days? Do I automate image manipulation on my server using node-imagemagick when I want to edit the uploaded file?  What kinds of options work on mobile browsers/touch devices? How do I make it support drag and drop on desktop browsers with Angular.js?

And afterwards, should I save this photo to my database server using GridFS (or gridfs-stream), or some place in the cloud? Do I read a photo file submitted from a form using Express's multer library (express extension for multipart forms), or should I submit the photo as a base64 encoded string? All questions I mulled over extensively when considering this functionality.

After analyzing several options, I have arrived at a very clever solution which I would like to share with the community (as always, it may not fit your use case exactly, but it should give you some things to think about). I can say with confidence now, my solution will do the following:
  • Provide a means to drag and drop photos on modern desktop browsers or select them on mobile devices, using ng-file-upload (lightweight and provides a FileReader shim if you want to support older browsers)
  • Give the user the ability to crop the photo once it is uploaded. For this I used ngImgCrop, for its ease of use and touch support. It also outputs a base64 encoded image that is cropped for you (meaning you won't have to worry about this on the server). 
  • Provide an express server route for handling the image and convert it from a base64 string back to an image.
  • Store the image using Cloudinary, an inexpensive cloud image host that provides image manipulation and fast delivery.
  • Write the code in a generic way that makes it easily reusable and modular, following best Node.js patterns
This is quite a powerful combination when you think about it! After reviewing several blogs about how Grid FS performance and doing image manipulation yourself can bog down the server if not handled extremely carefully, and how storing base64 strings heavily bloats your database, this made the cloud solution an easy choice for me (although if you absolutely must store the image in-house there are two good references here and here).

You can see the result of my work in action when you select your profile photo at urbanchampsports.com.

Now for the code. 

First the view template... (note I have chosen to use Angular material flex box containers for making it responsive, but any responsive framework should work fine).
   
Drop image or click to upload profile photo
Save Photo Change Photo
This defines the following elements for our view:
  • a drop box container for drag and drop of photos
  • the user's current photo (if one has already been saved)
  • a progress indicator (to display during file upload)
  • an image crop container (for use while the user is cropping the photo)
  • and finally, buttons for saving the photo and resetting it (once a photo exists)
Pretty straightforward, but things to note are use of the "ngf-change" directive from the ng-file-upload library, and the "img-crop" directive from the ngImgCrop library. These directives allow you to read the file (giving an accept parameter to determine what type of photo you'd like to accept), and allow the user to crop the image. When the user has finished cropping the image, the "result-image" parameter allows you to specify the scope variable for your resulting image (note the size is used to specify a target size). Here is the relevant scope variables in my Angular controller for handling this interaction:

    /**
     * Profile Photo Upload scope variables
     */
    $scope.loading = false;
    $scope.uploadPhoto = null;
    $scope.croppedPhoto = null;

    $scope.readFileImg = function(files){
      $scope.uploadPhoto = null;
      $scope.croppedPhoto = null;
      $scope.user.photo = null;

      if (files && files.length) {
        var readImgCallback = function(err, img){
          $scope.loading = false;
          if(err) return Toaster.toastErrorMessage($scope, err);

          $scope.$apply(function(){
            $scope.uploadPhoto = img;
          });
        };
        $scope.loading = true;

        Formulator.readImageFile(files[0], readImgCallback);
      }
    };

    $scope.upload = function () {
      if ($scope.croppedPhoto) {
        $scope.loading = true;

        var uploadCallback = function(currentUser){
          currentUser.$promise.then(function(user){
            $scope.user = user;
            Toaster.toastSuccess('Photo saved.');
          });
        };

        Auth.updateProfilePhoto($scope.croppedPhoto, uploadCallback)
          .catch( function(err) {
            Toaster.toastErrorMessage($scope, 'Error saving photo.');
          })
          .finally(function(){
            $scope.loading = false;
          });
      }
      else {
        $scope.loading = false;
      }
    };
To make this solution more generic (so it can be used across my site), I have defined factory utilities for reading the image file (using an HTML5 FileReader), and uploading it to the server (using my Auth factory). Note that the factory below checks the file size does not exceed 4 MB, and the file type is an image. Upon upload completion, we load this image into our ngImgCrop directive (at this point it is a "File" type). Once the user has finished cropping, we upload the output base64 encoded image string to the server (shown below). Note: you can disregard the "Toaster" calls, these are utility calls for notifying the user via Angular Material toasts...

angular.module('urbanChampSportsApp')
  .factory('Formulator', function Formulator() {

    return {
      readImageFile: function(file, cb){
        if(window.FileReader){
          if(file.size > 4000000){
            return cb('Error, photo exceeds max size limit.');
          }
          if(!file.type.match('image.*')){
           return cb('Error, file must be a photo.');
          }

          var reader = new FileReader();
          reader.onloadend = function (event) {
            if(event.target.error != null){
              return cb('Error, please try another photo.');
            }
            else {
              return cb(null,reader.result);
            }
          };
          reader.readAsDataURL(file);
        }
        else {
          return cb("Sorry, this browser doesn't support photo uploads.");
        }
      }
    };
  });

And the upload to the server using $resource...
angular.module('urbanChampSportsApp')
  .factory('Auth', function Auth($location, $rootScope, $http, User, $cookieStore, $q) {
    var currentUser = {};
    if($cookieStore.get('token')) {
      currentUser = User.get();
    }

      /**
       * Update large profile photo
       */
      updateProfilePhoto: function(photo, callback){
        var cb = callback || angular.noop;

        return User.updateProfilePhoto({id : currentUser._id}, {
          photo: photo
        }, function(user) {
          currentUser = User.get();
          return cb(currentUser);
        }, function(err) {
          currentUser = User.get();
          return cb(err);
        }).$promise;
      }
    };
  });

angular.module('urbanChampSportsApp')
  .factory('User', function ($resource) {
    return $resource('/api/users/:id/:controller', {
      id: '@_id'
    },
    {
      get: {
        method: 'GET',
        params: {
          id:'me'
        }
      },
      updateProfilePhoto: {
        method: 'PUT',
          params: {
            controller: 'profilePhoto'
          }
      }
   });
 });

NOTE: There is one gotcha with the ngImgCrop implementation. It currently does not support some portrait (vertical) images uploaded on the iPhone. To fix this, you can apply the following patch to its source:
https://github.com/iblank/ngImgCrop/pull/1

Now for the fun part, handling the image on the Node.js server. The server now takes the following steps:
  • Decodes the base64 image string to a file buffer (stripping any 'data:image' tags)
  • Writes the buffer to a temporary file (so that it can be uploaded to the cloud)
  • Uploads the image to Cloudinary (cloud image host)
  • Removes the temporary file and stores the Cloudinary response url as the user's profile image
  • Returns the response url to the client

First the Express route definition...

'use strict';
var express = require('express');
var controller = require('./user.controller');
var config = require('../../config/environment');
var auth = require('../../auth/auth.service');

var router = express.Router();

router.delete('/:id', auth.hasRole('admin'), controller.destroy);
router.get('/me', auth.isAuthenticated(), controller.me);
router.put('/:id/profilePhoto', auth.isAuthenticated(), controller.updateProfilePhoto);
router.post('/', controller.create);

module.exports = router;


Next we implement the route handler (controller method) for uploading the photo:

var User = require('./user.model');
var passport = require('passport');
var config = require('../../config/environment');
var imageHelper = require('../../components/helper/imageHelper');

/**
 * Updates user profile photo
 */
exports.updateProfilePhoto = function(req, res) {
  var userId = req.user._id;

  User.findById(userId, function (err, user) {
    if(user && req.body.photo) {
      imageHelper.uploadBase64Image('./.tmp/' +userId + '_profile.jpg', req.body.photo, function(err, result){
        if(err) res.send(400, err);
        else{
          user.photo = String(result.url);
          user.save(function(err) {
            if(err) return validationError(res, err);
            res.send(200);
          });
        }
      });
    } else {
      res.send(400);
    }
  });
};

To make our solution more reusable, we are going to define our image decoding and cloud upload modules separately. This keeps our controller clean and allows for code reuse. When the upload is finished, we simply set the url string on our mongoose model for the user, and return it to the client.

The implementation for our "imageHelper" is defined below. It makes use of the awesome Async.js library for handling the asynchronous events we need to process. I highly recommend this utility to every Node.js developer.

//imageHelper.js
'use strict';
var async = require('async');
var fs = require('fs');
var cloudinaryHelper = require('./cloudinaryHelper');

//Decodes a base64 encoded image and uploads it to Cloudinary
module.exports.uploadBase64Image = function(tmpPath, base64Image, cb){
  var imageBuffer = decodeBase64Image(base64Image);

  async.waterfall([
      //write image to tmp disk
      function writeImage(callback) {
        fs.writeFile(tmpPath, imageBuffer.data, function(err) {
          callback(err,tmpPath);
        });
      },
      //upload to cloudinary
      function upload(tmpPath, callback){
        cloudinaryHelper.upload(tmpPath, callback);
      },
      function removeFile(result, callback){
        fs.unlink(tmpPath, function(err) {
          callback(err, result);
        });
      }
    ], function(err, result){
      if(err) console.error(err);
      cb(err,result);
    }
  );
};

function decodeBase64Image (dataString){
  var matches = dataString.match(/^data:([A-Za-z-+\/]+);base64,(.+)$/),
    response = {};

  if (matches.length !== 3) {
    return new Error('Invalid input string');
  }

  response.type = matches[1];
  response.data = new Buffer(matches[2], 'base64');
  return response;
}

For further isolation, we define our Cloudinary upload method separately in a "cloudinaryHelper" module. Note our Cloudinary config constants/app secrets are defined in the global config and not in the module.

//cloudinaryHelper.js
var cloudinary = require('cloudinary');
var config = require('../../config/environment');

cloudinary.config({
  cloud_name: config.cloudinary.cloud_name,
  api_key: config.cloudinary.apikey,
  api_secret: config.cloudinary.apisecret
});

module.exports.upload = function(imgPath, callback){
  cloudinary.uploader.upload(imgPath, function(result) {
    console.log('Cloudinary photo uploaded result:');
    console.log(result);
    if(result){
      callback(null, result);
    }
    else {
      callback('Error uploading to cloudinary');
    }
  });
};


And wah lah! We now have a fully functioning profile photo upload feature! The image is stored in the cloud (as to lighten the load on our app server), and we simply store its hosting URL in the database.

We can also now manipulate its size on the fly! This is a win win.

For example, the following photo upload that is 250px X 250px:
http://res.cloudinary.com/urbanchampsports-com/image/upload/v1440950445/opmsrfg69tip8ryswjdn.png


Can easily be changed to the following (to modify its width and height to 100px X 100px) upon request:
http://res.cloudinary.com/urbanchampsports-com/image/upload/w_100,h_100/v1440950445/opmsrfg69tip8ryswjdn.png


Boom! This makes our life much easier on the client, as simply modifying a URL string gives us the image size we'll need for different breakpoints and use cases.

I hope you enjoyed this solution as much as I did. Happy Profiling :)

Tuesday, January 13, 2015

So you want a dashboard?

I recently completed a project for Blue Cross Blue Shield of North Carolina in which we designed and developed a member engagement dashboard, called BlueConnect. Dashboards these days have quite a few features such as draggable tiles, responsive media queries for tablet and mobile devices, animated charts and graphics, third party API services, and maybe even social media integration. I have been swamped with work supporting a project such as this, but I wanted to take some time to jot down some notes and share some insights.

I won't get into the details on everything, but I will just share a few high level concepts. First, some general advice on code structure/team organization.

  • Make sure to leverage a version control system and agree on it first as a team. I highly recommend Vincent Driessen's git flow documented here.
  • Use a build/automation system like Grunt or Gulp. It will save you time at every step of the way and make your code optimized.
  • Choose a client side framework that is robust, and ideally supports testing. We went with Angular because of the widespread community support. Some Angular JS libraries we found useful:
  • For structuring your CSS, I highly recommend splitting your media queries into separate files so that they can be conditionally loaded, and modified for IE. We chose to organize these by breakpoint, and this helped tremendously with code organization.
Now, for the dashboard itself. 

  • First, decide on base tile sizes. Handling a multitude of asynchronous requests in a tile dashboard can be a nightmare if you don't have proper templating and a sound structural approach. For this reason, we first developed base templates upon which our actual content would be loaded, and that could be used for early DOM rendering and tile placement. This can easily be done using Angular's ng-repeat and ng-include directives. These base templates were constrained to "single-wide" and "double-wide" tile for our use case, but these could easily be expanded to as many variations as you need. I recommend choosing sizes that flow easily across different screens for best results, and if you want to meet smaller mobile devices like the iPhone 4, choose a tile size under 320px. Another nice thing about Angular's two way binding/ng-repeat, is that it will automatically re-render tiles quickly if you programmatically change the list (say from outside events, or a change in viewport size).
  • Choose a bin-packing library. These are useful for arranging items within a space in the most efficient way. There are a few of these out there, but the best one I've seen by far is Packery JS. These make your dashboard elements fit nicely, and provide support for things like draggability. There is some great examples of this with Angular here and here and here.
  • After the base content has loaded and you have initialized Packery, you'll want to render your content within your base template (possibly using ng-include or other Angular mechanisms). Ng-include supports variable templates, so we simply passed the name of our content templates in our tile array object. I recommend showing the user a loading spinner for any asynchronous loaded content (such as social media or third party feeds) in your base template. You can do this easily using Angular-Spinner and libraries such as imagesLoaded for any longer loading graphics. 
Lastly, consider animations for your app. These may require some special handling, but for simple animations, you can make use of Animate.css. We chose to add a delayed "fade In" effect for the tiles, which nicely presented them to the user as their content is loaded. Another useful library for animating graphs is Highcharts.js. This library certainly gives your application a dashboard "feel" as your user is presented with animated data charts.

There you have it...a dashboard is waiting ahead! If you have any trouble or questions, please feel free to contact me. 

Monday, March 10, 2014

Amazing Builds with Grunt.js

Continuing with my previous post on my new app Urban Champ, I recently optimized my build process using Grunt.js.

Grunt is an amazing build tool which can be used to do a variety of things. Currently I am using Grunt tasks for concatenating and minifying css files, running the RequireJS build optimizer, preprocessing HTML (to do things like point your built HTML at compiled/minified scripts), and image minification. Grunt is also extremely useful for separating your build targets (such as development and production) and then firing up a server on your localhost. I really like the livereload grunt "watch" task which will automatically reload your server as you change source files in your editor.

My hats off to the Grunt team! I will definitely be keeping a close eye on future Yeoman generators using Grunt. This is an extremely powerful tool for all you web devs out there!

Node grunt packages installed:
{
  "name": "UrbanChamp",
  "version": "0.1.0",
  "devDependencies": {
    "grunt": "~0.4.1",
    "grunt-contrib-concat": "^0.3.0",
    "grunt-contrib-uglify": "^0.4.0",
    "grunt-contrib-cssmin": "^0.9.0",
    "grunt-contrib-requirejs": "^0.4.3",
    "grunt-contrib-clean": "^0.5.0",
    "grunt-open": "^0.2.3",
    "grunt-contrib-connect": "^0.7.1",
    "grunt-contrib-watch": "^0.5.3",
    "grunt-contrib-livereload": "^0.1.2",
    "grunt-uncss": "^0.2.0",
    "grunt-processhtml": "^0.3.0",
    "connect-modrewrite": "^0.6.3-pre",
    "grunt-contrib-imagemin": "^0.5.0"
  }
}

Gruntfile.js:
'use strict';
var modRewrite = require('connect-modrewrite');
var lrSnippet = require('grunt-contrib-livereload/lib/utils').livereloadSnippet;
var mountFolder = function (connect, dir) {
    return connect.static(require('path').resolve(dir));
};


module.exports = function (grunt) {
    grunt.initConfig({
      clean: {
        build: {
          src: ['build']
        },
        css: {
          src: ['build/App/css/*.css','!build/App/css/tidy.min.css']
        },
        images: {
          src: ['build/App/images/*']
        }
      },
      watch: {
          livereload: {
              files: [
                  'app/App/*.html',
                  '{.tmp,app}/App/css/{,*/}*.css',
                  '{.tmp,app}/App/js/{,*/}*.js',
                  'app/App/images/{,*/}*.{png,jpg,jpeg,gif,webp,svg}'
              ],
              tasks: ['livereload']
          }
      },  
      connect: {
          options: {
              port: 8888,
              // change this to '0.0.0.0' to access the server from outside
              hostname: 'localhost'
          },
          livereload: {
              options: {
                  middleware: function (connect) {
                      return [
                          modRewrite(
             ['!\\.html|\\.js|\\.svg|\\.css|\\.png|\\.jpg$ /index.html [L]']),
                          lrSnippet,
                          mountFolder(connect, '.tmp'),
                          mountFolder(connect, 'app')
                      ];
                  }
              }
          },
          dist: {
              options: {
                  middleware: function (connect) {
                      return [
                          mountFolder(connect, 'build')
                      ];
                  }
              }
          }
      },          
      open: {
          server: {
              path: 'http://localhost:8888'
          }
      },      
      requirejs: {
        dist: {
         options: {
           appDir: 'app',
            baseUrl: 'App/js', 
            optimize: 'uglify',
            preserveLicenseComments: false,        
            mainConfigFile: 'app/App/js/main.js',
            dir: 'build'
         }
        }
      },
      concat: {
        dist: {
          src: ['app/App/css/*'],
          dest: 'build/App/css/tidy.css'
        }
      },
      cssmin: {
          dist: {
            src:'build/App/css/tidy.css',
            dest: 'build/App/css/tidy.min.css'
          }
      },      
      processhtml: {
        dist: {
          files: {
            'build/index.html': ['app/index.html']
          }
        }
      },
      imagemin:{
        dynamic: {
          files: [{
            expand: true,                  // Enable dynamic expansion
            cwd: 'app/App/images',                   // Src matches are relative to this path
            src: ['**/*.{png,jpg,gif}'],   // Actual patterns to match
            dest: 'build/app/images'                  // Destination path prefix
          }]          
        }

      }            
});


// load plugins
grunt.loadNpmTasks('grunt-contrib-cssmin');
grunt.loadNpmTasks('grunt-contrib-clean');
grunt.loadNpmTasks('grunt-contrib-requirejs');
grunt.loadNpmTasks('grunt-open');
grunt.loadNpmTasks('grunt-contrib-watch');
grunt.loadNpmTasks('grunt-contrib-connect');
grunt.loadNpmTasks('grunt-contrib-cssmin');
grunt.loadNpmTasks('grunt-processhtml');
grunt.loadNpmTasks('grunt-contrib-concat');
grunt.loadNpmTasks('grunt-contrib-imagemin');


// register at least this one task
grunt.registerTask('build', ['clean:build','requirejs', 'concat','cssmin','processhtml', 'clean:css', 'clean:images', 'imagemin']);
grunt.registerTask('default', ['build']);

grunt.registerTask('server', function (target) {
    if (target === 'dist') {
        return grunt.task.run(['build', 'open:server', 'connect:dist:keepalive']);
    }

grunt.task.run(['open:server', 'connect:livereload:keepalive', 'watch']);
});
};

Thursday, February 27, 2014

Urban Champ: a user contributed sports arena

The past five months, I have been hard at work on my nights and weekends developing what I feel to be the best application concept I have ever dreamed up. The first step, building a beta web app so I can begin gathering user feedback, is almost complete. The app doesn't do too terribly much right now, but I am still infatuated with the concept. Before I bore you with the details, here's the link to my starter project:

http://urbanchamp.parseapp.com/

It currently provides these basic functions:

  • ability to signup as a user
  • ability to create a tennis court with a geocoded address and basic info, and give player feedback on the court
  • ability to view local courts on a google map, and filter them by these attributes
  • ability to create a tennis league or tennis tournament at a given court, and allow flexible match scheduling
  • ability to view and register for tournaments/leagues in your area
  • ability to start a tournament and generate match-up brackets/draws
  • ability to enter match results and advance tournament rounds
  • automatic leveling/scoring of players based on prior match history and level of competition
And most importantly, all of these functions are provided 100% free to the users. As of now, I am currently working on adding the following (if you are interested in helping, please email me!):

  • rankings - automatically tracking player rankings by county, state, and country
  • the "ESPN" scoreboard, a cool graphical effect that displays a "news" ticker of recent match scores in the area
  • match making - a random match making service that couples you with other similarly rated players in your area also looking for a match
  • a mobile app for entering scores and receiving push notifications about upcoming matches

I have always been amazed by these "competitive arenas" in online video games, and it baffles me why we haven't translated this same sort of phenomenon to competitive sports. As I set out to write the interfaces, I will surely be reviewing the same interfaces that kept me addicted for more competition in the old Battle.net (PC) and Halo (XBOX) days.

Now for the back story. The origins of this app go a ways back to my first season of USTA tennis. I was just getting started with competitive tennis, having played a full Summer and Fall season with friends and family before signing up. I had no idea what competitive tennis was like in my area, so I started asking around and looking for some competition. To my disappointment, there were no affordable flex leagues (outside the expensive country club tennis leagues), and it seemed like every league required you to first have a USTA tennis rating before joining. So, being as competitive as I am, I decided to join the USTA and start my first season of USTA tennis. How bad could it be, right?

To my dismay, I was first informed that I must have a team of no less than eight players (because USTA men's matches always consist of two singles matches, and three doubles matches). I was next informed the matches would adhere to a strict schedule, matches would always be scheduled on Fridays, Saturdays, and Sundays (because everyone plays competitive tennis on these days of the week). Not so bad I guessed... I could just change my weekend schedule. When it came time to signup, I was notified via email by the local league coordinator that I must register with my teammates and pay a league team fee of $50, a per player fee of $25, a yearly USTA membership of $44, and a $16 per match fee (on top of purchasing balls and any other equipment). Wow, I thought! That seems a bit excessive for a casual tennis player like myself, just looking for some competition to keep it interesting. I approved the fees with my wife (since it would obviously hit the budget), and decided it was worth the cost to keep my interest peaked and get exercise competing at something I enjoyed.

After I scrambled to get enough players for a team, we all rushed over to tennislink.usta.com to signup before the hard cut-off date. What further ensued (and became my greatest motivation for Urban Champ) was a general disbelief at how poor a nation-wide tennis association website could be implemented. When I first attempted to login to a 10 year-old ASPX form, I was informed my password was incorrect. What?! I just signed up with my USTA issued membership number, how could this be? I attempted to reset the password, but of course the link failed. Finally, I bailed out and called the 1-800 number... "USTA services, can I help you?" "Yes, my password isn't working. Can you help me?" "Well, I will need your membership number," she replied. So I gave her the number and sure enough, "I'm sorry, I'm going to have to pull up our old system to get back with you, it looks like the account isn't pulling up." Five minutes passed, and she finally came back, "Sir, it looks like your membership was registered in 1997, and since membership numbers are re-used per customer, we're going to have to reset the account manually for you". No way!!! You are still re-using accounts issued over 15 years ago!!! I had to trace my memory way back to when my parents had signed me up for a summer tennis camp in 4th grade. For whatever reason, that ALSO required a USTA membership.

After the registration fiasco, I could finally focus on the matches. At the first match, I was quickly informed by a league veteran, "most of the players in this league are sticklers, they'll quickly call you out for the slighest rule infraction". Can't you give them any kind of bad feedback I wondered?  After the match, it was time to enter the scores. I logged back into Tennis Link and somehow managed to find the match scoring page (completely separate from any of the "My Tennis Page" areas of the site and nested on another league page). After finding the page, it requested a unique match number. What match number? Ohhh, so you mean I have to navigate back to the matches page, copy the number, and then paste it in this form so I can ACTUALLY enter the match scores? OK, I sighed as I navigated this labyrinth. Next I was prompted with a somewhat mysterious scoring form. After reading the scoring rules in fine print, I manged to figure out tie break scores should simply be entered as "1-0" or  "0-1" and individual points would not be recorded.

When it came time for the playoffs, I was informed only four of the twenty-two teams in the league would be advancing (not a huge issue, but still it would be nice if this were more flexible). The season ended on a positive note with my team nearly knocking off one of the top teams, so we could at least try again next season, right? Wrong, there were only two men's sessions in the USTA calendar, a winter and spring session only. Summer and Fall sessions were reserved for Juniors, Mixed Doubles, and Flex Leagues (for players with varying ratings). Bummer, it would be a 6 month wait.

After my first USTA tennis league experience, coupled with my competitive video gaming history and a frequent urging from team mates and other tennis acquaintances to use my software experience to build a tennis site where players could freely setup tennis leagues and matches as they pleased, Urban Champ was born.

Stay tuned for more!

RestSharp - using the Json.net serializer

On a recent project, it became apparent we had an issue when our date inputs started magically incrementing after a few saves by the user. We later found the culprit to be the serialization settings in the Rest Sharp C# library. The default RestSharp serializer was changing these DateTimes to adjust for UTC time against the server time, i.e. we would send '2-26-2014 : 4:49 PM' on the client and the RestSharp library would then translate this to '2-26-2014 9:49 PM" to adjust for UTC/GMT time. After several saves by the user you can probably guess what happens.

The fix for us ending up being avoiding the default RestSharp serializer and just reverting to use the Json.net serializer. You can do this by by overriding the request object's JsonSerializer property like so:


            var client = new RestClient("http://localhost:62104/");
            var request = new RestRequest("Product/card/margin", Method.POST);
            request.RequestFormat = DataFormat.Json;
            request.JsonSerializer = new RestSharpJsonNetSerializer();

You will of course need to define the custom Json.net serializer (shown below). The Rest Sharp team has provided this on their help page along with explanations about their move away from the Json.Net serializer.

https://github.com/restsharp/RestSharp/blob/master/readme.txt

You may lose some features of the RestSharp JsonSerializer, but if you are OK with that this approach should work great. Hopefully this helps someone else in the same boat!

            
using System.IO;
using Newtonsoft.Json;
using RestSharp.Serializers;

namespace MySerializerNamespace
{

    /// 
    /// Default JSON serializer for request bodies
    /// Doesn't currently use the SerializeAs attribute, defers to Newtonsoft's attributes
    /// 
    public class RestSharpJsonNetSerializer : ISerializer
    {
        private readonly Newtonsoft.Json.JsonSerializer _serializer;

        /// 
        /// Default serializer
        /// 
        public RestSharpJsonNetSerializer()
        {
            ContentType = "application/json";
            _serializer = new Newtonsoft.Json.JsonSerializer
            {
                MissingMemberHandling = MissingMemberHandling.Ignore,
                NullValueHandling = NullValueHandling.Include,
                DefaultValueHandling = DefaultValueHandling.Include
            };
        }

        /// 
        /// Default serializer with overload for allowing custom Json.NET settings
        /// 
        public RestSharpJsonNetSerializer(Newtonsoft.Json.JsonSerializer serializer)
        {
            ContentType = "application/json";
            _serializer = serializer;
        }

        /// 
        /// Serialize the object as JSON
        /// 
        /// Object to serialize
        /// JSON as String
        public string Serialize(object obj)
        {
            using (var stringWriter = new StringWriter())
            {
                using (var jsonTextWriter = new JsonTextWriter(stringWriter))
                {
                    jsonTextWriter.Formatting = Formatting.Indented;
                    jsonTextWriter.QuoteChar = '"';

                    _serializer.Serialize(jsonTextWriter, obj);

                    var result = stringWriter.ToString();
                    return result;
                }
            }
        }

        /// 
        /// Unused for JSON Serialization
        /// 
        public string DateFormat { get; set; }
        /// 
        /// Unused for JSON Serialization
        /// 
        public string RootElement { get; set; }
        /// 
        /// Unused for JSON Serialization
        /// 
        public string Namespace { get; set; }
        /// 
        /// Content type for serialized content
        /// 
        public string ContentType { get; set; }
    }
}

Sunday, September 22, 2013

Making strides at Heartland


Recently, my company publicly announced their partnership with Big Commerce, a large scale e-Commerce provider. Having helped with this integration for the past several months, it feels great to know my work is making an impact!

Details:
http://finance.yahoo.com/news/retailers-omni-commerce-heartland-payment-120500693.html

Heartland's merchants are now able to open an e-Commerce store and quickly make their product's available online (similar to Amazon's Web Store). After uploading their product inventories and setting up their online site at Big Commerce, they simply select Heartland as their payment gateway, and enter in their account verification details (a process I am intimately familiar with having developed the Heartland APIs). After verification is complete, they can publish their store to their custom domain and process all payments with Heartland (very cool!). Considering Heartland has very competitive rates for their payment processing, this is a huge win for the company and Heartland's clients.

Obviously I can't give specifics or share source code of the API, but I can share from a technical perspective that writing RESTful services/Web APIs and exposing them to your business partners makes your solutions much more flexible and dynamic. When a partner is able to instantly sign up and send billing details to your service, you are able to quickly synchronize information between parties, and make billing decisions in real-time. This really makes things easier on your downstream reporting applications, and when you have a service oriented architecture (SOA), partnerships become fast and easy to implement and offer instant feedback to all parties involved.

Great work to everyone who helped with the project!

Monday, July 29, 2013

Backbone Marionette apps with Parse!

I have recently completed a simple Backbone Marionette application using the Parse SDK as a stoarge back-end and cloud hosting environment. As far as I know, this is the first "Todo" template out there using these frameworks. You can see the application here:
http://marionette-todo.parseapp.com/

And the source code here:
https://github.com/priley86/parse-marionette-todo

There is also an ASP.NET MVC4 template for those that prefer a Visual Studio development environment:
 https://github.com/priley86/marionette-mvc4-bootstrap-template/tree/Parse-Backend

All of the documentation about the frameworks and setup is listed on the github markdown file, but I wanted to point out a few things about this template and the benefit from using this approach.

First, you vastly cut down on application development and setup time by using the Parse back-end. Parse handles all of the object storage for you and sets up flexible APIs for you automatically when you save objects to your Parse application via the SDK. No more time wasted worrying about the database, user management, or an API layer. It's all done. Oh, and by the way, they'll host your web application for you. It's all free while you are developing, and very cheap to get enterprise scale hosting and custom domains. Start-up doesn't get any easier than this.

Second, Marionette is a very extensible plugin for Backbone which makes your single page app development much smoother. You save lines of code (because Marionette handles the trivial things like template rendering), and your application becomes easier to manage and maintain. Marionette takes care of the things you frequently do, and most of the things that Backbone forgets to, like event aggregation, view structuring (for collections and models), view layouts, and much more.

A few things to point out in each of the templates that I found important as I wrote it. There isn't enough time to cover everything on Parse and Backbone-Marionette, but the links below will help get you familiar with them:

Marionette
https://github.com/marionettejs/backbone.marionette

Parse

First, you will want to make sure you take care of your Parse initialization in it's own Require JS module. Running this in another module or outside of Require will lead to errors. Also, make sure you set the Parse jquery reference to your application's jquery reference since Parse depends on this:

/* Parse.js */
define(
  ['jquery'
], function ($) {
      "use strict";

      Parse.$ = $;
      Parse.initialize("YOUR_APP_ID", "YOUR_JAVASCRIPT_KEY");
      return Parse;
  }
);

Next, notice that our collections and models are no longer Backbone collections and models, but Parse collections and models:

 /* Todo.js */
define(['Parse'], function (Parse) {
    'use strict';

    return Parse.Object.extend({
        className: "Todo",
        defaults: {
            title: '',
            completed: false,
            created: 0
        }
     ...

/* TodoList.js */
define(['Parse', '../models/Todo'], function (Parse, Todo) {
    'use strict';

    return Parse.Collection.extend({
        model: Todo,
    ...

Now that we have our Parse models and collections, it is important to remember to set the current user and their access control list (created in the login view) before creating any new persisted models

 /* Header.js */
define(['marionette', 'tpl!../templates/header.html'], function (Marionette, header) {
  "use strict";

  return Marionette.ItemView.extend({
      ...
       if (evt.which === ENTER_KEY && todoText) {
        this.collection.create({
            title: todoText,
            user: Parse.User.current(),
            ACL: new Parse.ACL(Parse.User.current())
        });

And when querying your Parse user's persisted objects, set the query parameter's accordingly:

 /* Layout.js */
        ...
        onShow: function () {
            
            //instantiate our collection instance for each of our views
            var viewOptions = {
                collection : this.todoList
            };

            this.headerRegion.show(new HeaderView(viewOptions));
            this.mainRegion.show(new TodoListCompositeView(viewOptions));
            this.footerRegion.show(new FooterView(viewOptions));
            
            // Setup the query for the collection to look for todos from the current user
            this.todoList.query = new Parse.Query(Todo);
            this.todoList.query.equalTo("user", Parse.User.current());

            // Fetch all the todo items for this user
            this.todoList.fetch();

If you do this correctly, you will see the user's objects created successfully with the user specified:


Lastly, there is an easy guide for deploying your application to Parse. A few quick shell commands to deploy your app to the Parse cloud, and your app is up and running. Guide:
https://parse.com/docs/cloud_code_guide#hosting

Way to simple, right? I will be blogging more about the Parse SDK in the future as I develop some amazing cloud applications! Parse has way too many features to cover in one blog post, so stay tuned!

Saturday, June 8, 2013

MVC4-Marionette TodoMVC Template

It has been some time since I last posted, and honestly I'm not sure how long it will be until the next.... But I try to leave my interesting findings on this blog when I have the time. Lately I have been totally devoted to various single page application frameworks, and all of us in the development community have seen a great deal of popularity in this area lately. Single page javascript applications are fast, do most of their work on the client browser, and scale easily. They also make applications much more responsive because most of your client/server requests are lessened to the JSON model data returned by the asynchronous ajax requests your application makes after the initial page load. Google's Gmail is a great example of a SPA. The days of reloading/resubmitting lots of html from the server to the browser after each page request are coming to a close.

There are a large number of SPA frameworks gaining steam, notably Durandal, Backbone, and Angular JS. Each of these SPA variants often share many of the same core ideas, approaches, and libraries for implementing SPAs:

Typically there is the following components in a good SPA framework:

  • A templating library for interactive HTML templates (example library: Underscore js)
  • A binding library for DOM/HTML & Javascript application interaction. This typically handles things like application events, callbacks, model HTML bindings (example libraries: Knockout, Backbone)
  • A routing library for handling client side application routing (example libraries: Sammy js, Backbone)
  • AMD libraries for module definitions. These enable you to use common patterns for defining separated modules and make up for some of the inherent limitations of the javascript language. An example widely used in most SPAs today is Require js. 
  • Methods for synchronizing or serializing your model data to and from the server (whether this is via a service or directly to database file) OR HTML5's local storage (which has become quite useful for many test applications). Some example libraries for this include Breeze js and Backbone js. 
As you can see, Backbone is a pretty extensive framework for building single page apps, thus the reason it is being used by many of the most popular websites in the world today. There are also many extensions available (such as Marionette) which simplify the development process and reduce the amount of repeatable code you need to write.

I have recently begun work on a simple SPA for a client and decided to share my template for the rest of the community. It makes use of the following frameworks:

  • Underscore
  • Backbone
  • Marionette
  • Twitter Bootstrap styling
  • Require
  • MVC4/Web API

I have not included any Web API methods in this application (as it makes use of a Backbone local storage library), but the frameworks are provided in the default MVC4 project in Visual Studio 2012. The application provided is a simple refactorization of Jarrod Overson's Backbone/Marionette TodoMVC application. This approach differs in that it aims to allow for ample division in structure for specific pages within your SPA.

The main reason I wanted to make this open to the public was because I was not able to find a Backbone/Marionette MVC template which makes use of Microsoft's nuGet package management tools in Visual Studio. NuGet is most widely used with Microsoft applications and makes package management easy because of its integration with Visual Studio.Often JS libraries pulled from various sources can be difficult to manage and maintain from version to version. NuGet attempts to resolve these issues by managing dependencies between libraries.

Backbone and Marionette have been upgraded to the latest stable versions in this template (Backbone v1.0.0 and Marionette 1.03.1).

My template:
https://github.com/priley86/marionette-mvc4-bootstrap-template

Jarrod Overson's (older) template:
https://github.com/jsoverson/todomvc/tree/master/labs/dependency-examples/backbone_marionette_require

I will likely add additional findings to this template in the future as I come upon them, so please stay tuned.

Enjoy!

Thursday, November 15, 2012

Punchout Grid implementation

I was recently working on a client side grid implementation for a messaging application and stumbled upon EntitySpaces's Punchout Grid. It is a very lightweight Knockout grid implementation which I found quite easy to customize and put to use in a generic sort of way. It supports paging and sorting, however the sorting methods were left up to the developer to implement (you can see some of the sorting methods I have added in the punchout_grid.js file for basic types).

I have slightly modified the template to add some of the Twitter bootstrap table styles, and added some custom knockout bindings for cell bound and header bound events. The beauty of this approach is you significantly improve page load times (trust me, I've compared with several other jQuery grids), and it enables you to write much cleaner code leveraging Knockout's DOM/Javascript object binding. This will help you avoid writing excess jQuery methods to manipulate the DOM and make use of the powerful MVVM pattern (making your UI much more flexible and interactive).

To use the grid, simply construct a JSON data property in your view model (I used an extension to pass in my strongly typed MVC view's JSON data), and pass in the grid column definitions in the columns property:
//strongly typed model property names
var idPropertyName = '@Html.DisplayNameFor(model => model.FirstOrDefault().ID)';
var flaggedPropertyName = '@Html.DisplayNameFor(model=> model.FirstOrDefault().Flagged)';

var viewModel = {
   //data
   data: ko.observableArray(@(new MvcHtmlString(Model.ToJSON()))),
   
   //knockout observableArray 
   columns: ko.observableArray([
               {
                   "columnName": idPropertyName, "dataType": "Int32", "displayName": idPropertyName, "isNullable": false,
                   "isVisible": false, "isSortable": false, "propertyName": idPropertyName
               },
               {
                   "columnName": flaggedPropertyName, "dataType": "Boolean", "displayName": flaggedPropertyName, "isNullable": false,
                   "isVisible": true, "isSortable": true, "propertyName": flaggedPropertyName
               }
            ])
        }

Next implement any custom bindings/events needed for your grid (in this case I'm adding a custom css class to two of the grid columns):
ko.bindingHandlers.cellBound = {
    update: function (element, valueAccessor, allBindingsAccessor) {
        switch (valueAccessor()) {
            case flaggedPropertyName:
                $(element).text() == 'true' ? $(element).attr("class", "flagged") : $(element).attr("class", "unflagged");
                break;
            case attachmentPropertyName:
                $(element).text() > 0 ? $(element).attr("class", "attachment") : $(element).attr("class", "noattachment");
                break;
            default:
                return;
        }
    }
}

And finally add your html div for the grid:

Handling grid cell selections become as simple as the following:

When a row becomes selected, Knockout updates the data bound text box, and automatically updates the grid after the user edits the textbox.

The full implementation is on github here. Feel free to make use in your own projects, and enjoy!

Sunday, June 3, 2012

GoDaddy Blogger Subdomain Forwarding

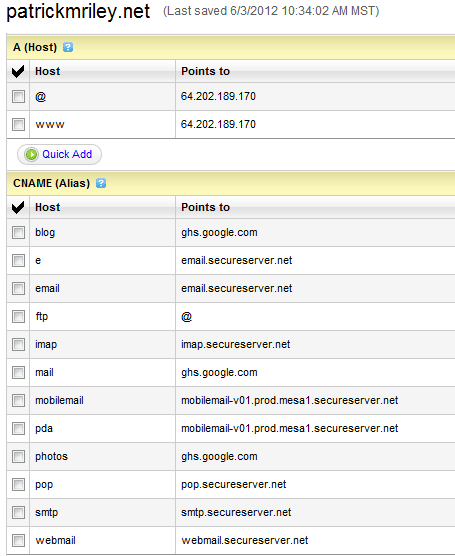
While setting up this blog, I was having trouble forwarding my "www" subdomain correctly within the GoDaddy Domain Manager page to my blogger blog. Currently, I want my top level (naked) domain (http://patrickmriley.net) along with my "www" subdomain (http://www.patrickmriley.net) to both forward to my Blogger blog. This can be achieved by using the GoDaddy DNS Zone File Editor and the GoDaddy Forwarding and Masking window (you might need to do some tinkering here, so grab a drink before trying at home). There is now a utility being offered by GoDaddy to do this but it doesn't seem to work very well for this scenario, so I have drawn up the steps below.

Step 1: Update your Zone file in the DNS Manager (A records for top level and www must point to 64.202.189.170 to tell GoDaddy this is a forwarded domain/subdomain, the blog subdomain should have a CNAME record pointed to ghs.google.com as indicated below)


Step 2: Use the GoDaddy Domain Manager Forwarding and Masking window to forward your domain and www subdomain to the desired subdomain. 


Step 3: Give it a few minutes and see if the forwarding takes effect. This can take up to 48 hours so be patient. If you get it right the first time, you'll save yourself a lot of frustration.

Hopefully this helps someone else out there!

Wednesday, May 30, 2012

PeekDataReader

For a current project, I needed to write an XML file for a batch transaction process. It just so happens that several transactions needed to be wrapped within a single batch element for a single order. What I needed was a simple extension class that wrapped SqlDataReader and allowed me to “peek” at the next row in the result set to check if the transaction was still within the current batch.
While doing a brief search, I found the following helper on Stack Overflow (SO). The correct way to do this is by implementing IDataReader as you cannot extend SqlDataReader. This is because SqlDataReader’s type constructor is marked internal in System.Data.dll and cannot be inherited.
The implementation on SO did not contain the pass-thru attributes and methods needed to implement IDataReader, IDataRecord, and IDisposable, so I decided to post this on my blog. Hope this helps someone out there!
sealed public class PeekDataReader : IDataReader
    {
        private IDataReader wrappedReader;
        private bool wasPeeked;
        private bool lastResult;

        public PeekDataReader(IDataReader wrappedReader)
        {
            this.wrappedReader = wrappedReader;
        }

        public bool Peek()
        {
            // If the previous operation was a peek, do not move...
            if (this.wasPeeked)
                return this.lastResult;

            // This is the first peek for the current position, so read and tag
            bool result = Read();
            this.wasPeeked = true;
            return result;
        }

        public bool Read()
        {
            // If last operation was a peek, do not actually read
            if (this.wasPeeked)
            {
                this.wasPeeked = false;
                return this.lastResult;
            }

            // Remember the result for any subsequent peeks
            this.lastResult = this.wrappedReader.Read();
            return this.lastResult;
        }

        public bool NextResult()
        {
            this.wasPeeked = false;
            return this.wrappedReader.NextResult();
        }

        #region IDataRecord pass-thru attributes and methods
        public int FieldCount { get { return this.wrappedReader.FieldCount; } }
        public object this[int i] { get { return this.wrappedReader[i]; } }
        public object this[string name] { get { return this.wrappedReader[name]; } }
        public bool GetBoolean(int i) { return this.wrappedReader.GetBoolean(i);}
        public byte GetByte(int i) { return this.wrappedReader.GetByte(i); }
        public long GetBytes(int i, long fieldOffset, byte[] buffer, int bufferoffset, int length) {
            return this.wrappedReader.GetBytes(i,fieldOffset,buffer,bufferoffset,length);}
        public char GetChar(int i) { return this.wrappedReader.GetChar(i); }
        public long GetChars(int i, long fieldoffset, char[] buffer, int bufferoffset, int length)
        {
            return this.wrappedReader.GetChars(i,fieldoffset,buffer,bufferoffset,length);
        }
        public IDataReader GetData(int i)
        {
            return this.wrappedReader.GetData(i);
        }
        public string GetDataTypeName(int i) { return this.wrappedReader.GetDataTypeName(i); }
        public DateTime GetDateTime(int i) { return this.wrappedReader.GetDateTime(i); }
        public decimal GetDecimal(int i) { return this.wrappedReader.GetDecimal(i); }
        public double GetDouble(int i) { return this.wrappedReader.GetDouble(i); }
        public Type GetFieldType(int i) { return this.wrappedReader.GetFieldType(i); }
        public float GetFloat(int i) { return this.wrappedReader.GetFloat(i); }
        public Guid GetGuid(int i) { return this.wrappedReader.GetGuid(i); }
        public short GetInt16(int i) { return this.wrappedReader.GetInt16(i); }
        public int GetInt32(int i) { return this.wrappedReader.GetInt32(i); }
        public long GetInt64(int i) { return this.wrappedReader.GetInt64(i); }
        public string GetName(int i) { return this.wrappedReader.GetName(i); }
        public int GetOrdinal(string name) { return this.wrappedReader.GetOrdinal(name); }
        public string GetString(int i) { return this.wrappedReader.GetString(i); }
        public object GetValue(int i) { return this.wrappedReader.GetValue(i); }
        public int GetValues(object[] values) { return this.wrappedReader.GetValues(values); }
        public bool IsDBNull(int i) { return this.wrappedReader.IsDBNull(i); }
        #endregion

        #region IDataReader pass-thru attributes and methods
        public int Depth { get { return this.wrappedReader.Depth; } }
        public bool IsClosed { get { return this.wrappedReader.IsClosed; } }
        public int RecordsAffected { get { return this.wrappedReader.RecordsAffected; } }
        public void Close() { this.wrappedReader.Close(); }
        public DataTable GetSchemaTable() { return this.wrappedReader.GetSchemaTable(); }
        #endregion

        #region IDisposable
        public void Dispose() { this.wrappedReader.Dispose(); }
        #endregion
    }


Sample use:
using (IDataReader reader = new PeekDataReader(/* actual reader */))
{
    if (reader.Peek())
    {
        // perform some operations on the first row if it exists...
    }

    while (reader.Read())
    {
        // re-use the first row, and then read the remainder...
    }
}

Thursday, October 27, 2011

SQL Azure Federations and Enzo Shard Demo

Attached are my powerpoint and C# demo of the Enzo SQL Shard library for the October KY Dot Net user group meeting. This presentation will cover Azure Federation concepts, sharding strategies, and a short demo of the Enzo SQL Shard Library utilizing a SQL Azure database.


Session information:

"Designing enterprise data solutions for today's cloud computing environments can leave the average architect puzzled and confused. Listen in as we discuss how database sharding and the upcoming release of Sql Azure Federations will provide virtually unlimited scalability of data for your enterprise applications. Data federation solutions will be analyzed as we examine some of the current data virtualization vendors and preview some of the new features of Sql Azure Federations. Additionally, a federation-aware codeplex library will be demonstrated which supports fan-out queries and parallel round robin loading. Don't miss!"


Bio: Patrick Riley is a software developer for the Rawlings Group in LaGrange, KY. He has worked on master data management solutions in the .NET framework and SQL Server for several years. He enjoys golf, grilling food on his Webber grill, and watching the technology race to the cloud

Feel free to send any feedback you might have to patrick@patrickmriley.net.

Enjoy!

PPTX:
Sql Azure Data Federations

Sample Enzo Federations Source Code:
EnzoShardCode_v1.0

Wednesday, August 31, 2011

Bitwise XOR on Byte Array

Spent the past few hours scrambling for a generic XOR solution on two byte arrays. I needed a solution that would add the match value to a specific result value if it did not already exist (assuming the most significant byte starts at the beginning of the array). You'd think this would be somewhere in the C# libraries by now. After an hour of searching, I decided to write my own. Ended up with the solution below.

static byte[] BitwiseXOR(byte[] result, byte[] matchValue)
{
    if (result.Length == 0)
    {
        return matchValue;
    }

    byte[] newResult = new byte[matchValue.Length > result.Length ? matchValue.Length : result.Length];
            
    for (int i = 1; i < newResult.Length+1; i++)
    {
        //Use XOR on the LSBs until we run out
        if(i > result.Length)
        {
            newResult[newResult.Length - i] = matchValue[matchValue.Length - i];
        }
        else if (i > matchValue.Length)
        {
            newResult[newResult.Length - i] = result[result.Length - i];
        }
        else
        {
            newResult[newResult.Length -i] = 
                (byte)(matchValue[matchValue.Length - i] ^ result[result.Length - i]);
        }
    }
    return newResult;
}

Thursday, August 25, 2011

Windows Azure Marketplace


In an attempt to update my blog, I am posting this from my January discussion at the KY .NET user group meeting on consuming cloud services. I will be speaking this October on Sql Azure Federations, and will be focusing my efforts in the coming year on cloud based applications. More to come…
Windows Azure Marketplace: Consuming the Cloud DataMarket
Leveraging the Cloud’s data services can provide real-time feeds that keep your users bustling. Learn how to quickly absorb the DataMarket’s datasets using OData APIs and expose them to client applications on any platform. A sample from Microsoft’s Windows Azure Support team utilizing a Windows Azure service to consume crime data from Data.gov will be discussed. OData, one of the cloud’s increasingly popular and flexible web protocols for querying and updating data, will be examined and reviewed.
Link to slides:
PPTX: Windows_Azure_Marketplace_Consuming_the_Cloud

Tuesday, August 23, 2011

Fuzzy matching: a programmer's view of the Damerau-Levenshtein algorithm


The sheer mechanics of fuzzy matching algorithms are fascinating. Optimized variations are behind search engines and optical character recognition (OCR) softwares we see on the market today. An interesting algorithm I've recently used for a patient matching solution utilizes the Damerau-Levenshtein distance algorithm to locate fuzzy matches.

The Levenshetin approach considers how many substitutions, deletions, and insertions are needed to make two strings equal (also known as the edit distance between the strings). The algorithm was later improved by Damerau to include transposition (step highlghted on line 55). This solution is an example of bottom-up dynamic programming, because a matrix is flood filled to find the minimum distance. The complexity is cubic, but is improved to K x L complexity when using a maximum distance of interest (where K is the maximum distance, and L is the shortest string). The algorithm below uses a maximum distance (threshold paramter) and other simple optimizations to vastly improve the performance of the Damerau-Levenshtein. It has been tested to run over 10K string compares/second with two given strings under ten characters in length and a maximum threshold of three edits.

public static int DamerauLevenshteinDistanceImproved(string string1, 
    string string2, int threshold)
{
    // Return trivial case - where they are equal
    if (string1.Equals(string2))
        return 0;

    // Return trivial case - where one is empty
    if (String.IsNullOrEmpty(string1) || String.IsNullOrEmpty(string2))
        return (string1 ?? "").Length + (string2 ?? "").Length;

    // Ensure string2 (inner cycle) is longer
    if (string1.Length > string2.Length)
    {
        var tmp = string1;
        string1 = string2;
        string2 = tmp;
    }

    // Return trivial case - where string1 is contained within string2
    if (string2.Contains(string1))
        return string2.Length - string1.Length;

    var length1 = string1.Length;
    var length2 = string2.Length;

    var d = new int[length1 + 1, length2 + 1];

    for (var i = 0; i <= d.GetUpperBound(0); i++)
        d[i, 0] = i;

    for (var i = 0; i <= d.GetUpperBound(1); i++)
        d[0, i] = i;

    for (var i = 1; i <= d.GetUpperBound(0); i++)
    {
        var im1 = i - 1;
        var im2 = i - 2;
        var minDistance = threshold;

        for (var j = 1; j <= d.GetUpperBound(1); j++)
        {
            var jm1 = j - 1;
            var jm2 = j - 2;
            var cost = string1[im1] == string2[jm1] ? 0 : 1;

            var del = d[im1, j] + 1;
            var ins = d[i, jm1] + 1;
            var sub = d[im1, jm1] + cost;

            //Math.Min is slower than native code here
            //d[i, j] = Math.Min(del, Math.Min(ins, sub));
            d[i, j] = del <= ins && del <= sub ? del : ins <= sub ? ins : sub;

            if (i > 1 && j > 1 && string1[im1] == string2[jm2] 
                         && string1[im2] == string2[jm1])
                d[i, j] = Math.Min(d[i, j], d[im2, jm2] + cost);

            if (d[i, j] < minDistance)
                minDistance = d[i, j];
        }

        if (minDistance > threshold)
            return int.MaxValue;
    }

    return d[d.GetUpperBound(0), d.GetUpperBound(1)] > threshold
        ? int.MaxValue
        : d[d.GetUpperBound(0), d.GetUpperBound(1)];
}

Saturday, March 5, 2011

How failure can breed success...

Having wrapped up two major projects in my first four months with a new company, one quote seems to come to mind: "success is overcoming your failures, one at a time". For a software developer, this point might be frequently overlooked. Small hurdles quickly get overshadowed with the next challenge. Reaching one milestone quickly opens discussion about the next.

But what do we hold onto on our journey? How do we learn from constant change?

One small victory opens a pandora of new opportunity, and a bigger gap for failure at the same time. With great risk, failure is inevitable. Those of us who embrace failure, will also embrace success.

Thanks for reading.

Wednesday, December 29, 2010

To the Cloud!

This week I am taking some time to discuss integrating your WP7 app with Windows Azure and the Microsoft “cloud”. This can be hugely beneficial if you happen to write the next “farmville”. The cloud offers the possibility to scale up and out, and in a matter of minutes.
In this post, I will show a quick demo and the tools you’ll need for constructing your all-embracing nimbus. Let’s get the basics first. You’ll need IIS 7, the WP7 developer tools, and the Windows Azure SDK. Once you get those out of the way, head over to the MSDN All-In-One Code team blog and download the demo. Ahhh, now for the fun stuff.
But first a bit of background. A core component to the Windows Azure platform has been neatly constructed in something we like to call “roles”, or runtimes for execution. Roles can be quickly targeted to any platform “in the cloud” and allow you to specify however many instances of your service or web application you would like. Roles are also easily configured in your role configuration file, or within the Azure platform app fabric portal. Web applications (defined within a web role) can be pushed across several endpoints with the push of a button!  Wow, right? Running as many background processes (worker roles) as you need is also supported. I know…I was excited too.
This demo showcases the Windows Azure Datamarket, another service being provided by Microsoft’s cloud which allows you to consume cloud data using a REST service and the OData protocol. Read the whitepaperfor more fascinating tidbits.  The Azure DataMarket requires your Microsoft Live Id and a data service subscription. Luckily, this demo uses a free Web Crime service provided by Data.gov. There are several others in the store which provide real time data feeds.
Enough chit chat, let’s see this in action. First you’ll want to pull down your Account subscription key and add it to the CrimeService.svc.cs file, i.e.:
private static string azureDataMarketAccountKey = “ey1Oab3KdvlEkIhk=”;
public List<CityCrimeWeight> GetCrimes()
{
List<CityCrimeWeight> results = new List<CityCrimeWeight>();
datagovCrimesContainer svc = new datagovCrimesContainer(new Uri(“https://api.datamarket.azure.com/Data.ashx/data.gov/Crimes/”));
svc.Credentials = new NetworkCredential(“yourLiveId”, azureDataMarketAccountKey);
// Obtain all crime data in New York.
var query = from c in svc.CityCrime where c.State == “New York” select c;
…


Next, fire up the demo in VS 2010 along with the Windows Azure Compute Emulator. This will enable you to watch web roles boot up. Here you can see I have specified two instances in my service configuration (csfg) file. The UI emulator will show your service endpoints along with your role runtime statements.


Once you have this piece in play, you’re almost ready to go. You can fire up your WP7 client application (preferably in another instance of Visual Studio) and see your cloud services at work. You may want to change the ServiceAddress property in the MainPage code behind depending on where the CrimeService web role was deployed, i.e.:
private static string ServiceAddress = 
    “http://127.0.0.1:81/CrimeService.svc/Crimes”;


This demo shows how easy it is to expand your WP7 application into a Azure Datamarket Cloud Consuming Machine! Hope you enjoyed.

Wednesday, October 27, 2010

MVVM & WP7 Presentation


I am excited about the chance to share some of my recent work with Dr.Ragade’s Software Engineering class today! We will be covering basics of Model View-View Model pattern, MVVM Light toolkit, and demo’ing some WPF & Windows Phone 7 Applications.
Here are some docs from the presentation:
PPTX: MVVM-WP7_2010
MVVM Light RTM (release to manufacturing) template:
MvvmLightPhone7Rtm template 
(place in your Silverlight templates folder)
Some helpful links for getting started with MVVM and Windows Phone 7:
Hope you enjoy! Let me know if you have any questions.